Using HTTPS with Kestrel in .NET Core
Posted by Dylan Beattie on 18 November 2020 • permalinkDuring 2020, I’ve been running a bunch of online workshops about building distributed systems with .NET Core. Over the course of the day, we build a REST API, hook it up to some microservice-style components using RabbitMQ and EasyNetQ, use gRPC to connect to a pricing engine, and then send the whole lot back into your web browser in real time using SignalR.
As it’s a hands-on workshop where attendees are writing their own clients and sending requests to my demo code, I need to run a real, public HTTP server as part of this - and because we’re hacking code as we go, I’m actually mapping an incoming port to my workstation here, which makes things a little interesting. If you’re running Kestrel in production, you’d normally stick it behind something like nginx, and terminate any HTTPS/SSL connections at the load balancer - but here I’m running it as a standalone .NET app, so I needed a way to use a real, properly signed SSL certificate for a local standalone Kestrel instance.
Here’s how I set it all up.
I’m using a free certificate from ZeroSSL - I’m hosting my example code here on workshop.ursatile.com, so I signed up with ZeroSSL and registered a free 90-day certificate for that hostname. When you click on “Install” here, you get the option to choose a Server Type - but there’s no mention of .NET Core, Kestrel or IIS in that list, so I went for “Default Format”:
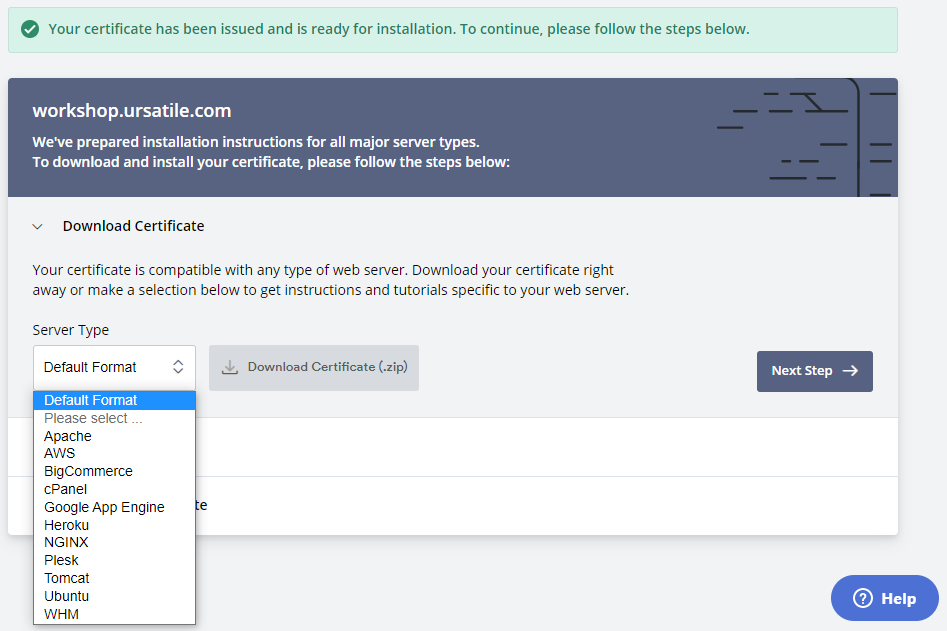
This will download a ZIP file containing three files - certificate.crt, ca_bundle.crt and private.key.
That’s the certificate itself, the chain of certificates used to verify it, and the RSA private key that was used to sign the certificate. In order to use the cert with Kestrel, though, we need to convert it from a CRT format into something called a PFX file.
To convert it, I’m using OpenSSL and following the instructions documented here:
D:\workshop.ursatile.com>openssl pkcs12 -export -out certificate.pfx -inkey private.key -in certificate.crt
It’ll prompt you for an export password - if you’re using this for anything even remotely sensitive, it’s a good idea to specify a secure password here.
- If you leave the export password blank, anybody who gets hold of the .PFX file can impersonate you
- Do not check your PFX file into Github or publish it online anywhere
Remember - there’s no point securing your PFX file with a secure password if you then hardcode that password into your Program.cs and check it into Github along with the .pfx file itself.
Once you’ve got your certificate exported as certificate.pfx, we need to tell the Kestrel web server to use it.
If you’ve created your ASP.NET Core web app the usual way, you’ll find a method in Program.cs called CreateHostBuilder - this is where we can specify the options passed to the Kestrel server when it’s started up. We’ll need to add a call to the webBuilder.ConfigureKestrel() method like this:
public static IHostBuilder CreateHostBuilder(string[] args) =>
    Host.CreateDefaultBuilder(args)
        .ConfigureWebHostDefaults(webBuilder => {

            webBuilder.ConfigureKestrel(options => {
                var port = 5001;
                var pfxFilePath = @"D:\workshop.ursatile.com\certificate.pfx";
                // The password you specified when exporting the PFX file using OpenSSL.
                // This would normally be stored in configuration or an environment variable;
                // I've hard-coded it here just to make it easier to see what's going on.
                var pfxPassword = "green cairo angle piano";

                options.Listen(IPAddress.Any, port, listenOptions => {
                    // Enable support for HTTP1 and HTTP2 (required if you want to host gRPC endpoints)
                    listenOptions.Protocols = HttpProtocols.Http1AndHttp2;
                    // Configure Kestrel to use a certificate from a local .PFX file for hosting HTTPS
                    listenOptions.UseHttps(pfxFilePath, pfxPassword);
                });
            });

            webBuilder.UseStartup<Startup>();
        });
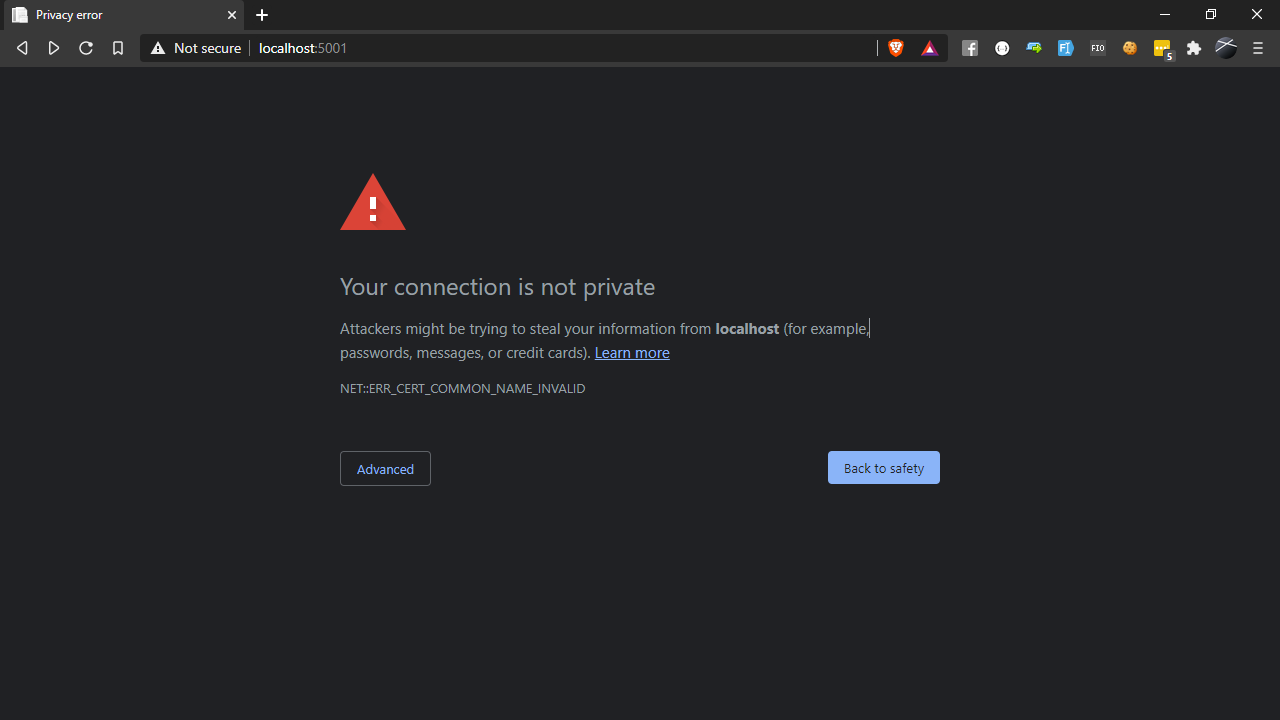
To check it’s all working, fire it up with dotnet run and then point a browser at http://localhost:5001 - you should see an error message just like this one:
but if you click “Advanced” and read the small print:
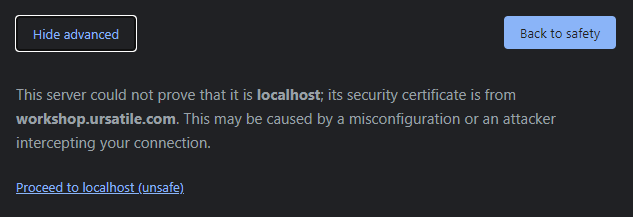
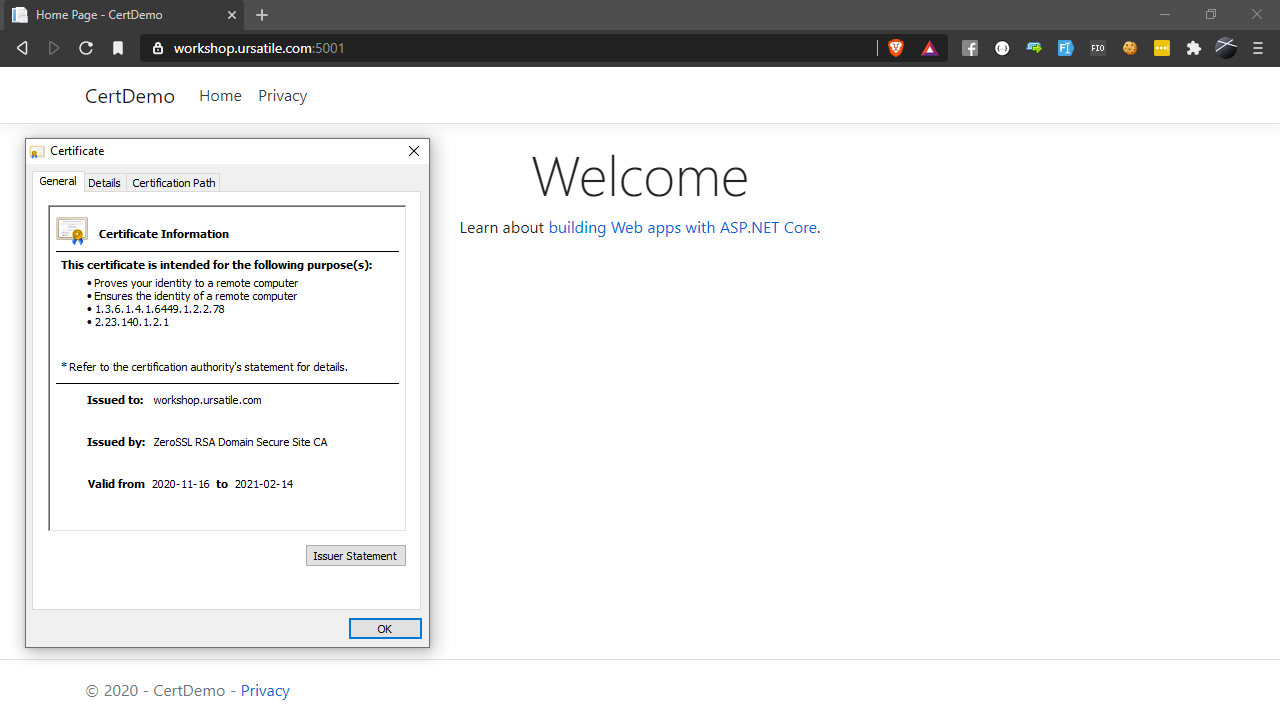
That’s actually exactly what we want. To run code locally using your new certificate, hack your hosts file and add a line to the end pointing workshop.ursatile.com or whatever domain you’re using at 127.0.0.1; if you want the rest of the world to play along too, you’ll need to register a DNS CNAME record pointing at your IP address and make sure that port 5001 (or whatever you used) is mapped to your workstation - oh, and remember to to disable the Windows firewall for that port.
But… is it safe?
Well, like most things in IT - it depends. If you do this, you’re effectively running a public web server in your house - and, yes, it’s definitely better doing this with a proper HTTPS certificate than just leaving it wide open. But it’s still not a great idea in terms of security.
When I do this for workshops and training, I open the ports in the morning, run it while I’m actually working with the group, then at the end of the day I shut the whole thing down and disable the port mappings - so if anybody did try to do anything malicious with it, I’d probably notice straight away, especially since I’m normally watching every single HTTP request because I’m curious to see how my workshop attendees are getting on. So as a teaching tool, I find it incredibly useful - but I’d never run an actual website from a development machine like this.